はじめに
この記事を読めば、JavaScriptでページネーションを作成する方法が身に付きます。
初心者向けに分かりやすく説明し、サンプルコードもたっぷりとご紹介。
どんなウェブサイトでも応用できるページネーションをマスターしましょう!
●JavaScriptでページネーションを作る基本
○ページネーションの仕組み
ページネーションとは、ウェブページ上のデータを分割して表示するための仕組みです。
例えば、ブログ記事や商品一覧など、一度に表示すると長すぎるデータを複数のページに分けて見やすくすることが目的です。
○サンプルコード1:基本的なページネーション
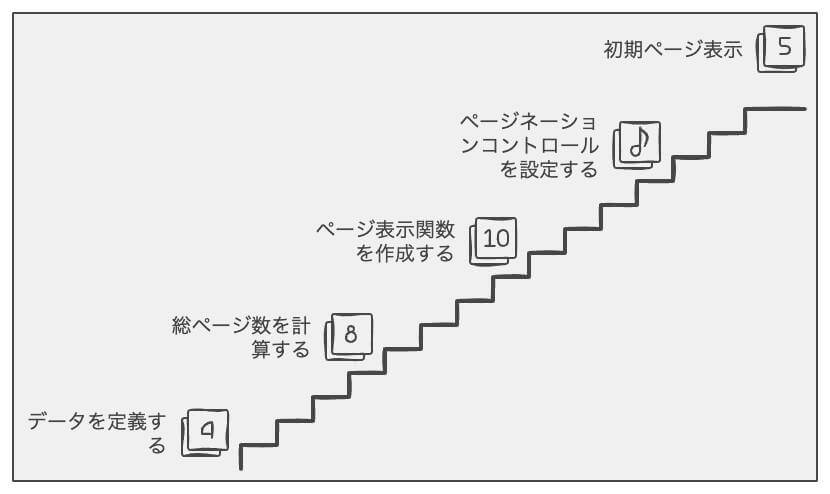
このコードでは、JavaScriptを使って基本的なページネーションを実装しています。
この例では、10個のデータを1ページに3個ずつ表示するようにしています。
<!DOCTYPE html>
<html lang="ja">
<head>
<meta charset="UTF-8">
<title>基本的なページネーション</title>
</head>
<body>
<div id="data-container"></div>
<div id="pagination"></div>
<script>
const data = ['データ1', 'データ2', 'データ3', 'データ4', 'データ5', 'データ6', 'データ7', 'データ8', 'データ9', 'データ10'];
const itemsPerPage = 3;
const totalPages = Math.ceil(data.length / itemsPerPage);
const dataContainer = document.getElementById('data-container');
const pagination = document.getElementById('pagination');
function showPage(page) {
dataContainer.innerHTML = '';
const startIndex = (page - 1) * itemsPerPage;
const endIndex = startIndex + itemsPerPage;
const pageItems = data.slice(startIndex, endIndex);
for (const item of pageItems) {
const div = document.createElement('div');
div.textContent = item;
dataContainer.appendChild(div);
}
pagination.innerHTML = '';
for (let i = 1; i <= totalPages; i++) {
const button = document.createElement('button');
button.textContent = i;
button.onclick = () => showPage(i);
pagination.appendChild(button);
}
}
showPage(1);
</script>
</body>
</html>
●JavaScriptのページネーション応用例
ここからは、JavaScriptでページネーションを応用した例をいくつか紹介していきます。
さまざまな機能を追加することで、より使いやすく、見栄えの良いページネーションを作成できます。
○サンプルコード2:無限スクロール
このコードでは、無限スクロールを実装したページネーションを紹介しています。
この例では、ユーザーがページ下部にスクロールすると、自動的に次のデータが表示されるようにしています。
<!DOCTYPE html>
<html lang="ja">
<head>
<meta charset="UTF-8">
<title>無限スクロール</title>
<style>
#data-container {
min-height: 100vh;
}
</style>
</head>
<body>
<div id="data-container"></div>
<script>
const data = Array.from({length: 100}, (_, i) => `データ${i + 1}`);
const itemsPerPage = 10;
let currentPage = 1;
const dataContainer = document.getElementById('data-container');
function showPage(page) {
const startIndex = (page - 1) * itemsPerPage;
const endIndex = startIndex + itemsPerPage;
const pageItems = data.slice(startIndex, endIndex);
for (const item of pageItems) {
const div = document.createElement('div');
div.textContent = item;
dataContainer.appendChild(div);
}
}
function checkScroll() {
const scrollTop = window.pageYOffset || document.documentElement.scrollTop;
const windowHeight = window.innerHeight || document.documentElement.clientHeight;
const scrollHeight = document.documentElement.scrollHeight;
if (scrollTop + windowHeight >= scrollHeight - 10) {
currentPage++;
showPage(currentPage);
}
}
window.addEventListener('scroll', checkScroll);
showPage(currentPage);
</script>
</body>
</html>
○サンプルコード3:フィルタリング機能付きページネーション
このコードでは、フィルタリング機能を追加したページネーションを紹介しています。
この例では、カテゴリによってデータを絞り込むことができます。
<!DOCTYPE html>
<html lang="ja">
<head>
<meta charset="UTF-8">
<title>フィルタリング機能付きページネーション</title>
</head>
<body>
<select id="category-filter">
<option value="">すべて</option>
<option value="A">カテゴリA</option>
<option value="B">カテゴリB</option>
</select>
<div id="data-container"></div>
<div id="pagination"></div>
<script>
const data = [
{category: 'A', content: 'データ1'},
{category: 'A', content: 'データ2'},
{category: 'B', content: 'データ3'},
// ...(他のデータ)
];
const itemsPerPage = 3;
const dataContainer = document.getElementById('data-container');
const pagination = document.getElementById('pagination');
const categoryFilter = document.getElementById('category-filter');
function showPage(page, filterCategory) {
const filteredData = filterCategory ? data.filter(item => item.category === filterCategory) : data;
const totalPages = Math.ceil(filteredData.length / itemsPerPage);
const startIndex = (page - 1) * itemsPerPage;
const endIndex = startIndex + itemsPerPage;
const pageItems = filteredData.slice(startIndex, endIndex);
dataContainer.innerHTML = '';
for (const item of pageItems) {
const div = document.createElement('div');
div.textContent = item.content;
dataContainer.appendChild(div);
}
pagination.innerHTML = '';
for (let i = 1; i <= totalPages; i++) {
const button = document.createElement('button');
button.textContent = i;
button.onclick = () => showPage(i, filterCategory);
pagination.appendChild(button);
}
}
categoryFilter.addEventListener('change', (event) => {
showPage(1, event.target.value);
});
showPage(1);
</script>
</body>
</html>
○サンプルコード4:ソート機能付きページネーション
このコードでは、ソート機能を追加したページネーションを作成しています。
この例では、昇順または降順にデータを並べ替えることができます。
<!DOCTYPE html>
<html lang="ja">
<head>
<meta charset="UTF-8">
<title>ソート機能付きページネーション</title>
</head>
<body>
<button id="sort-asc">昇順</button>
<button id="sort-desc">降順</button>
<div id="data-container"></div>
<div id="pagination"></div>
<script>
const data = [
{id: 1, content: 'データ1'},
{id: 2, content: 'データ2'},
{id: 3, content: 'データ3'},
// ...(他のデータ)
];
const itemsPerPage = 3;
const dataContainer = document.getElementById('data-container');
const pagination = document.getElementById('pagination');
const sortAsc = document.getElementById('sort-asc');
const sortDesc = document.getElementById('sort-desc');
function showPage(page, sortedData) {
const totalPages = Math.ceil(sortedData.length / itemsPerPage);
const startIndex = (page - 1) * itemsPerPage;
const endIndex = startIndex + itemsPerPage;
const pageItems = sortedData.slice(startIndex, endIndex);
dataContainer.innerHTML = '';
for (const item of pageItems) {
const div = document.createElement('div');
div.textContent = item.content;
dataContainer.appendChild(div);
}
pagination.innerHTML = '';
for (let i = 1; i <= totalPages; i++) {
const button = document.createElement('button');
button.textContent = i;
button.onclick = () => showPage(i, sortedData);
pagination.appendChild(button);
}
}
function sortData(order) {
const sortedData = [...data];
sortedData.sort((a, b) => {
return order === 'asc' ? a.id - b.id : b.id - a.id;
});
return sortedData;
}
sortAsc.addEventListener('click', () => {
const sortedData = sortData('asc');
showPage(1, sortedData);
});
sortDesc.addEventListener('click', () => {
const sortedData = sortData('desc');
showPage(1, sortedData);
});
showPage(1, data);
</script>
</body>
</html>
○サンプルコード5:検索機能付きページネーション
このコードでは、検索機能を追加したページネーションを作成しています。
この例では、キーワードを入力してデータを検索し、一致するデータを表示できます。
<!DOCTYPE html>
<html lang="ja">
<head>
<meta charset="UTF-8">
<title>検索機能付きページネーション</title>
</head>
<body>
<input type="text" id="search-input" placeholder="キーワードを入力">
<button id="search-button">検索</button>
<div id="data-container"></div>
<div id="pagination"></div>
<script>
const data = [
{id: 1, content: 'データ1'},
{id: 2, content: 'データ2'},
{id: 3, content: 'データ3'},
// ...(他のデータ)
];
const itemsPerPage = 3;
const dataContainer = document.getElementById('data-container');
const pagination = document.getElementById('pagination');
const searchInput = document.getElementById('search-input');
const searchButton = document.getElementById('search-button');
function showPage(page, filteredData) {
const totalPages = Math.ceil(filteredData.length / itemsPerPage);
const startIndex = (page - 1) * itemsPerPage;
const endIndex = startIndex + itemsPerPage;
const pageItems = filteredData.slice(startIndex, endIndex);
dataContainer.innerHTML = '';
for (const item of pageItems) {
const div = document.createElement('div');
div.textContent = item.content;
dataContainer.appendChild(div);
}
pagination.innerHTML = '';
for (let i = 1; i <= totalPages; i++) {
const button = document.createElement('button');
button.textContent = i;
button.onclick = () => showPage(i, filteredData);
pagination.appendChild(button);
}
}
function filterData(keyword) {
const filteredData = data.filter(item => {
return item.content.includes(keyword);
});
return filteredData;
}
searchButton.addEventListener('click', () => {
const keyword = searchInput.value;
const filteredData = filterData(keyword);
showPage(1, filteredData);
});
showPage(1, data);
</script>
</body>
</html>
○サンプルコード6:アニメーション効果を追加する
このコードでは、ページネーションの表示にアニメーション効果を追加する方法を紹介しています。
この例では、ページ遷移時にフェードインとフェードアウトのアニメーションを使用して、スムーズな表示切り替えを実現しています。
<!DOCTYPE html>
<html lang="ja">
<head>
<meta charset="UTF-8">
<title>アニメーション効果を追加するページネーション</title>
<style>
.fade-in {
animation: fadeIn 0.5s ease-in-out forwards;
}
.fade-out {
animation: fadeOut 0.5s ease-in-out forwards;
}
@keyframes fadeIn {
0% {
opacity: 0;
}
100% {
opacity: 1;
}
}
@keyframes fadeOut {
0% {
opacity: 1;
}
100% {
opacity: 0;
}
}
</style>
</head>
<body>
<div id="data-container"></div>
<div id="pagination"></div>
<script>
const data = [
{id: 1, content: 'データ1'},
{id: 2, content: 'データ2'},
{id: 3, content: 'データ3'},
// ...(他のデータ)
];
const itemsPerPage = 3;
const dataContainer = document.getElementById('data-container');
const pagination = document.getElementById('pagination');
function showPage(page) {
const totalPages = Math.ceil(data.length / itemsPerPage);
const startIndex = (page - 1) * itemsPerPage;
const endIndex = startIndex + itemsPerPage;
const pageItems = data.slice(startIndex, endIndex);
dataContainer.classList.add('fade-out');
setTimeout(() => {
dataContainer.innerHTML = '';
for (const item of pageItems) {
const div = document.createElement('div');
div.textContent = item.content;
dataContainer.appendChild(div);
}
dataContainer.classList.remove('fade-out');
dataContainer.classList.add('fade-in');
}, 500);
pagination.innerHTML = '';
for (let i = 1; i <= totalPages; i++) {
const button = document.createElement('button');
button.textContent = i;
button.onclick = () => showPage(i);
pagination.appendChild(button);
}
}
dataContainer.classList.add('fade-in');
showPage(1, data);
</script>
</body>
</html>
○サンプルコード7:レスポンシブデザイン対応ページネーション
このコードでは、レスポンシブデザインに対応したページネーションを作成する方法を紹介しています。
この例では、ブラウザの幅に応じてページネーションの表示が自動的に変わるように設定しています。
<!DOCTYPE html>
<html lang="ja">
<head>
<meta charset="UTF-8">
<meta name="viewport" content="width=device-width, initial-scale=1.0">
<title>レスポンシブデザイン対応ページネーション</title>
<style>
#pagination {
display: flex;
flex-wrap: wrap;
justify-content: center;
}
#pagination button {
flex: 1;
min-width: 50px;
max-width: 100px;
margin: 5px;
padding: 10px;
font-size: 16px;
}
</style>
</head>
<body>
<div id="data-container"></div>
<div id="pagination"></div>
<script>
const data = [
{id: 1, content: 'データ1'},
{id: 2, content: 'データ2'},
{id: 3, content: 'データ3'},
// ...(他のデータ)
];
const itemsPerPage = 3;
const dataContainer = document.getElementById('data-container');
const pagination = document.getElementById('pagination');
function showPage(page) {
const totalPages = Math.ceil(data.length / itemsPerPage);
const startIndex = (page - 1) * itemsPerPage;
const endIndex = startIndex + itemsPerPage;
const pageItems = data.slice(startIndex, endIndex);
dataContainer.innerHTML = '';
for (const item of pageItems) {
const div = document.createElement('div');
div.textContent = item.content;
dataContainer.appendChild(div);
}
pagination.innerHTML = '';
for (let i = 1; i <= totalPages; i++) {
const button = document.createElement('button');
button.textContent = i;
button.onclick = () => showPage(i);
pagination.appendChild(button);
}
}
showPage(1);
</script>
</body>
</html>
○サンプルコード8:Bootstrapを利用したページネーション
このコードでは、Bootstrapフレームワークを用いてページネーションを実装する方法を紹介しています。
この例では、Bootstrapのページネーションコンポーネントを使って、見た目が美しいページネーションを簡単に作成しています。
<!DOCTYPE html>
<html lang="ja">
<head>
<meta charset="UTF-8">
<meta name="viewport" content="width=device-width, initial-scale=1.0">
<title>Bootstrapを利用したページネーション</title>
<link href="https://cdn.jsdelivr.net/npm/bootstrap@5.1.0/dist/css/bootstrap.min.css" rel="stylesheet">
</head>
<body>
<div class="container">
<div id="data-container" class="mt-3"></div>
<nav aria-label="ページネーション" class="mt-3">
<ul id="pagination" class="pagination">
</ul>
</nav>
</div>
<script>
const data = [
{id: 1, content: 'データ1'},
{id: 2, content: 'データ2'},
{id: 3, content: 'データ3'},
// ...(他のデータ)
];
const itemsPerPage = 3;
const dataContainer = document.getElementById('data-container');
const pagination = document.getElementById('pagination');
function showPage(page) {
const totalPages = Math.ceil(data.length / itemsPerPage);
const startIndex = (page - 1) * itemsPerPage;
const endIndex = startIndex + itemsPerPage;
const pageItems = data.slice(startIndex, endIndex);
dataContainer.innerHTML = '';
for (const item of pageItems) {
const div = document.createElement('div');
div.textContent = item.content;
dataContainer.appendChild(div);
}
pagination.innerHTML = '';
for (let i = 1; i <= totalPages; i++) {
const li = document.createElement('li');
li.className = 'page-item';
if (i === page) {
li.classList.add('active');
}
const button = document.createElement('button');
button.textContent = i;
button.className = 'page-link';
button.onclick = () => showPage(i);
li.appendChild(button);
pagination.appendChild(li);
}
}
showPage(1);
</script>
</body>
</html>
○サンプルコード9:外部APIと連携したページネーション
このコードでは、外部APIを利用してデータを取得し、ページネーションを実装する方法を紹介しています。
この例では、GitHub APIを使ってリポジトリの情報を取得し、ページネーションを実現しています。
<!DOCTYPE html>
<html lang="ja">
<head>
<meta charset="UTF-8">
<meta name="viewport" content="width=device-width, initial-scale=1.0">
<title>外部APIと連携したページネーション</title>
<style>
/* 簡単なスタイルの追加 */
#repo-list {
list-style: none;
padding: 0;
}
.pagination {
display: flex;
list-style: none;
padding: 0;
}
.pagination li {
margin-right: 5px;
}
.pagination button {
background-color: #f1f1f1;
border: 1px solid #ccc;
padding: 5px 10px;
cursor: pointer;
}
</style>
</head>
<body>
<div id="repo-container"></div>
<ul id="pagination" class="pagination"></ul>
<script>
const apiUrl = 'https://api.github.com/search/repositories?q=language:javascript&sort=stars&order=desc';
const itemsPerPage = 10;
const repoContainer = document.getElementById('repo-container');
const pagination = document.getElementById('pagination');
async function fetchRepos(page) {
const response = await fetch(`${apiUrl}&per_page=${itemsPerPage}&page=${page}`);
const data = await response.json();
return data.items;
}
function displayRepos(repos) {
repoContainer.innerHTML = '';
const ul = document.createElement('ul');
ul.id = 'repo-list';
for (const repo of repos) {
const li = document.createElement('li');
li.textContent = `${repo.name} (${repo.stargazers_count} stars)`;
ul.appendChild(li);
}
repoContainer.appendChild(ul);
}
function updatePagination(totalPages, currentPage) {
pagination.innerHTML = '';
for (let i = 1; i <= totalPages; i++) {
const li = document.createElement('li');
const button = document.createElement('button');
button.textContent = i;
button.onclick = () => showPage(i);
if (i === currentPage) {
button.disabled = true;
}
li.appendChild(button);
pagination.appendChild(li);
}
}
async function showPage(page) {
const repos = await fetchRepos(page);
displayRepos(repos);
updatePagination(Math.ceil(repos.length / itemsPerPage), page);
}
showPage(1);
</script>
</body>
</html>
○サンプルコード10:カスタムデザインのページネーション
このコードでは、カスタムデザインのページネーションを作成する方法を紹介しています。
この例では、CSSを使ってページネーションのボタンのスタイルを変更し、オリジナルのデザインを適用しています。
<!DOCTYPE html>
<html lang="ja">
<head>
<meta charset="UTF-8">
<title>カスタムデザインのページネーション</title>
<link rel="stylesheet" href="styles.css">
</head>
<body>
<div class="pagination">
<button class="btn" id="prev">前へ</button>
<button class="btn" id="next">次へ</button>
</div>
<script src="pagination.js"></script>
</body>
</html>
/* styles.css */
.btn {
background-color: #4CAF50;
border: none;
color: white;
padding: 10px 20px;
text-align: center;
text-decoration: none;
display: inline-block;
font-size: 16px;
margin: 4px 2px;
cursor: pointer;
border-radius: 5px;
}
.btn:hover {
background-color: #45a049;
}
// pagination.js
const prevButton = document.getElementById('prev');
const nextButton = document.getElementById('next');
prevButton.addEventListener('click', () => {
// 前のページへ遷移する処理
});
nextButton.addEventListener('click', () => {
// 次のページへ遷移する処理
});
●注意点と対処法
ページネーションを実装する際には、いくつかの注意点があります。
それぞれの注意点と、それらに対処する方法を説明します。
ページ数が多すぎる場合の対処法
ページ数が多くなると、すべてのページ番号を表示することが難しくなります。
この場合、ページ番号の表示範囲を制限し、現在のページの前後にある数ページだけを表示するようにすると、見た目がすっきりします。
また、最初と最後のページへのリンクを追加することで、ユーザーが簡単に最初や最後のページにアクセスできるようになります。
ページが空の場合の対処法
表示すべきデータが少ない場合や、フィルタリング結果が空の場合など、ページが空になることがあります。
このような場合には、ページネーションを非表示にするか、メッセージを表示してユーザーに情報を提供することが重要です。
ページロードの最適化
ページネーションをクリックするたびに、全てのデータを再度読み込むことは効率が悪いです。
そのため、ページネーションの実装にはAjaxやフロントエンドのフレームワークを利用し、必要なデータのみを取得・表示することで、ページロード時間を短縮することができます。
SEOへの影響
ページネーションが適切に設定されていない場合、検索エンジンがページ内容を正しくインデックスできないことがあります。
この問題を解決するためには、rel=”prev”およびrel=”next”といったリンク属性を使用し、検索エンジンにページ間の関連性を伝えることが重要です。
●カスタマイズ方法
ページネーションを実装する際には、デザインや機能を自分のニーズに合わせてカスタマイズすることができます。
一般的なカスタマイズ方法を紹介します。
デザインの変更
ページネーションの見た目を変更するためには、CSSを使ってスタイルを調整することができます。
例えば、色やフォント、ボーダーなどを変更して、サイトのテーマに合わせたデザインにすることができます。
表示するページ番号の範囲の調整
ページ番号の表示範囲を変更することで、ページネーションの見た目や操作性を向上させることができます。
例えば、現在のページの前後に表示するページ数を増減させたり、最初と最後のページへのリンクを追加・削除することができます。
アイコンや矢印の追加
ページネーションにアイコンや矢印を追加することで、ユーザーにとって分かりやすく直感的な操作が可能になります。
例えば、FontAwesomeやMaterial Iconsなどのアイコンセットを使用して、前のページや次のページへのリンクを視覚的に強調できます。
ページネーションの動作をカスタマイズ
JavaScriptやjQueryを使用して、ページネーションの動作をカスタマイズすることができます。
例えば、クリック時のアニメーションを追加したり、Ajaxを利用してページ遷移をスムーズにすることができます。
まとめ
この記事では、ページネーションの基本的な実装方法や、さまざまなカスタマイズ方法を紹介しました。
デザインや機能性を向上させるために、自分のニーズに合わせたカスタマイズを行って、ユーザーにとって使いやすいページネーションを実現しましょう。
また、注意点と対処法を確認して、SEOやページロードの最適化など、ページネーションをより効果的に活用できるようにしましょう。